Restoring Old Photos with AI — A Guide to Colorization That Feels Real
Most of us have a shoebox somewhere — or a drawer, or a folder on a relative's hard drive — of photos that were taken before color film was common, or that faded over decades into monochrome. The people in them are smiling at cameras that no longer exist, standing in kitchens that have been renovated twice, wearing clothes that were bright in their day and grayscale forever after.
For a long time, bringing color back to those photos required either a gifted restoration artist with weeks to spare, or a set of Photoshop skills that 99% of the family archivists looking at those photos will never have. AI colorization changes that math completely. A convincing, historically plausible colorization of a 1940s portrait now takes about ten seconds. But the quality of that ten seconds depends on choices you make before you upload.
This guide covers how the technology actually works, what "historically plausible" means in practice, and how to use SoftOTT's photo colorization tool to get results your grandmother would recognize as real.
What AI Colorization Is Actually Guessing At
A black-and-white photo is not a photo with color removed. It is a photo that was taken by film or a sensor that recorded only luminance — brightness values per pixel — without any information about which wavelengths of light created that brightness. To add color, the model has to infer what was likely there.
It does this by learning from enormous sets of real color photos. Given millions of examples of skin, clothing, grass, sky, wood, brick, and metal, a neural network learns the typical relationships between grayscale intensity, texture, context, and hue. When you feed it a new black-and-white image, it identifies regions — "this is a face," "this is a collar," "this is foliage behind the subject" — and applies colors consistent with its training.
The key word is plausible. The model does not know what color your grandmother's specific wedding dress actually was. It knows what color wedding dresses of that era usually were, what kind of light was in the room, and what tones the fabric would reflect. It reconstructs a credible guess. If the guess is wrong in a specific case, you can correct it. But the guess starts much closer to reality than most people expect.
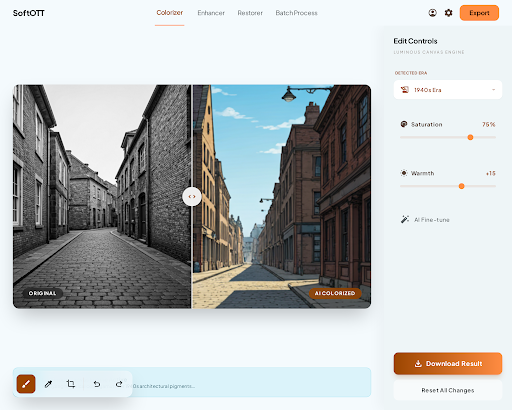
Why Era Awareness Matters
The hardest part of colorization is not the color itself — it is picking colors that feel right for the time. A 1958 kitchen had palettes that real 1958 kitchens used: pastel yellows, turquoise, chrome, linoleum reds that had been popular for exactly that decade. Color a 1958 kitchen with 2020 greige and the image will technically look "in color" but emotionally look fake. Something will be off, even if the viewer cannot name it.
Well-trained colorization models handle this by learning era-correlated tones. A photo with 1920s clothing cues, cracked matte paper, and a particular tonal range gets a different palette than a photo with 1970s collars and warmer paper stock. Get this right and the result stops looking like "a black-and-white photo someone painted" and starts looking like "a color photo that was taken."
A few specific cues a good model relies on:
- Clothing silhouettes. Lapel width, hem length, and collar shape encode the decade more precisely than almost anything else in the image.
- Paper tone. The original print's warm or cool cast tells the model roughly when and how the photo was processed, which correlates with the typical lighting of that era's flash and film.
- Context objects. A car, an appliance, or an interior light fixture in the background is often decade-specific and anchors the palette for the whole frame.
Picking Source Photos That Restore Well
Not every old photo restores equally. A few indicators to look for before you upload:
- Focus and contrast first. A sharp, high-contrast black-and-white photo gives the model more to work with than a soft, low-contrast one. If the source is blurry, color cannot fix that — it can only re-skin whatever is already readable.
- Scan quality matters. If you are restoring from a physical print, scan it at 600 DPI or higher, flat on glass, with even light. A phone snapshot of a photo at an angle introduces color casts and distortion that the model will try to colorize as if they were real.
- Original prints beat copies of copies. Each generation of photocopy or re-photograph loses tonal detail. If you have access to the original negative or the earliest print, start there.
- Mind the damage. Heavy stains, tears, and emulsion cracks change local tonal values. The model will happily colorize a coffee stain as if it were a birthmark. Consider a quick cleanup pass before colorization if the damage is localized.
The ideal source is boringly simple: a sharp, well-exposed, cleanly scanned black-and-white photo with clear subjects and visible context. Modern AI does the rest.
How to Get the Best Out of SoftOTT's Colorizer
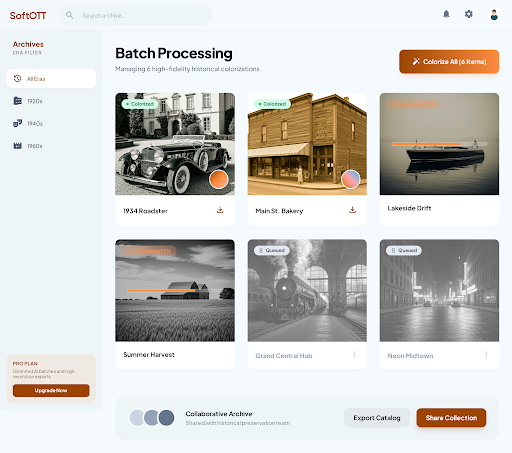
The tool is designed to give you a strong default result on the first pass. A few small habits make the difference between "good" and "show the whole family":
- Upload the largest file you have. Detail in the source directly translates to detail in the output. A 12-megapixel scan produces a noticeably richer colorization than a 2-megapixel phone capture of the same print.
- Try multiple versions of damaged photos. If a photo has a clear half and a damaged half, crop to the clear half and colorize that first. You will get a much better reference for what the full image's palette should be.
- Evaluate skin tones first. If skin reads as warm, natural, and consistent with the era, the rest of the image is usually close too. Skin is the single hardest region to get right, so if it passes, you can usually trust the palette.
- Don't over-correct. A muted, slightly desaturated result is often truer to the original scene than a vivid one. Most old photos depict rooms and clothes that were less saturated in real life than we imagine, because we have been conditioned by modern color photography to expect punch.
- Keep the black-and-white original. Always. Archive the original alongside the colorized version. Future models will be better than today's, and you will want to re-run the restoration at some point.
What Colorization Is Not
It is worth being honest about the limits. AI colorization is not a time machine. It cannot tell you what color your grandfather's tie actually was on a specific Tuesday in 1947. It can only tell you what color ties of that style usually were in 1947. For most family photos, that is enough — the emotional weight of seeing a familiar face in color swamps any factual uncertainty. For historical research or forensic purposes, it is not a substitute for primary evidence.
Treat colorized photos as lovingly illustrated versions of the original, not as corrected ones. Label them as such when you share them. The honesty actually makes them more meaningful, not less.
Ready to bring one of your own photos back to life? Start with SoftOTT's photo colorization tool and upload the clearest black-and-white photo you can find. The first one you restore tends to be the one that convinces you the rest of the shoebox is worth the afternoon.